Como criar um storymap: os princípios básicos para melhorar o teu backlog
O story mapping é um método para organizar user stories, permitindo uma visão holística de toda a experiência.
O que é story mapping?
Story mapping é um método para organizar user stories e permite criar uma visão mais holística de toda a experiência e processo. E sim, também é um método que pode ser proposto, usado ou moderado por designers.
Tenho usado este método quando trabalho em equipas de produto que usam maioritariamente a metodologia agile e onde a maturidade é reduzida e precisam de alguma guidance.
Isto porque força e educa as equipas a escrever user stories da forma correta, pensando mais nos utilizadores e menos na solução ou limitações técnicas.
No final de um Story Mapping deverás ter:
Uma visão holística do produto (backlog)
Featurespartidas em user stories
User storiespartidas em tarefas técnicas
Benefícios
O Story mapping pode ser usado durante vários momentos do teu projeto, como por exemplo, durante o planeamento de sprints. Este deve ser um documento vivo e ser alterado conforme a necessidade.
O Story mapping promove a visão de produto
As equipas técnicas podem ter acesso a uma visão do trabalho futuro
Mais fácil de mapear tudo (visualmente) e decidir qual será o MVP para a primeira release.
Quem deve estar presente neste workshop?
Equipas de User Experience
Equipas de desenvolvimento
Product owner / manager
Scrum master
Como fazer um story mapping
É importante lembrar que Story mapping deve representar as tarefas do utilizador de forma narrativa.
Relembro também que uma user story deve representar uma intenção e objetivo em vez de representar uma funcionalidade. Falaremos de user stories noutro artigo…
Não te foques na complexidade técnica, mas sim nas tarefas do utilizador.
É importante que as pessoas envolvidas conheçam todos os passos do processo para que se sintam à vontade de participar.
Já fiz este tipo de workshops com programadores que começavam a entrar em pânico se não falássemos de tarefas técnicas ou funcionalidades. Neste caso, digam-lhes que a seu tempo vamos chegar às tarefas técnicas, mas que é importante começar pelas tarefas na ótica do utilizador.
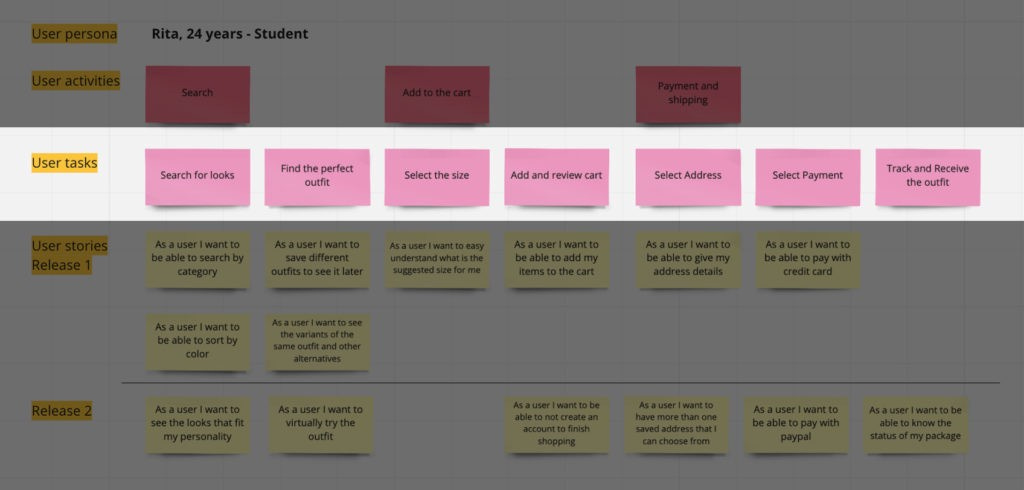
Primeiro vamos definir a nossa persona e descrever as suas tarefas na sua jornada.
Para ser mais fácil, e caso já exista algo criado, podes colocar essa tarefa como ponto central e completar as tarefas do utilizador que acontecem anterior e posteriormente a esse momento.
Não esquecer de escrever as tarefas de forma narrativa e definir corretamente a persona.
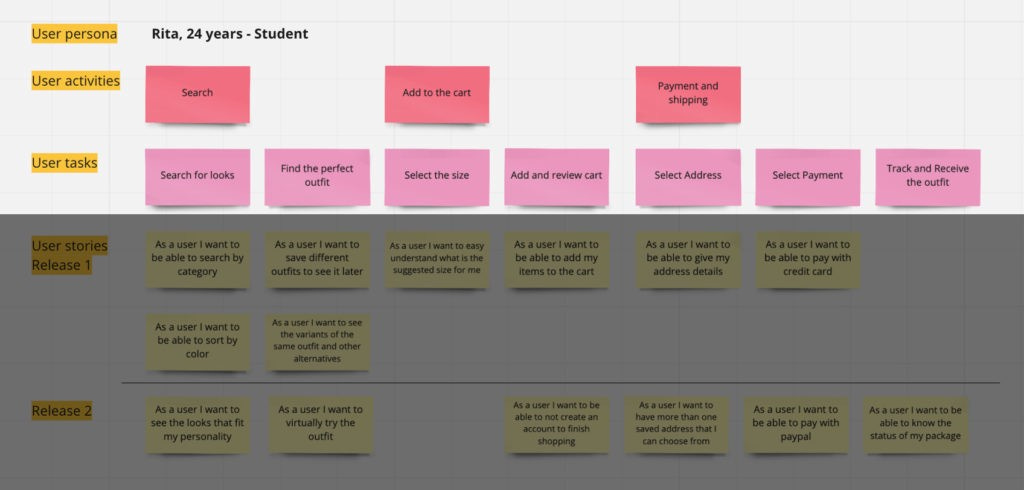
Mapear as tarefas em atividades
Agora que já tens as tarefas do utilizador podes categorizar ou organizá-las em atividades. Futuramente isto podem ser os épicos usados em product management.
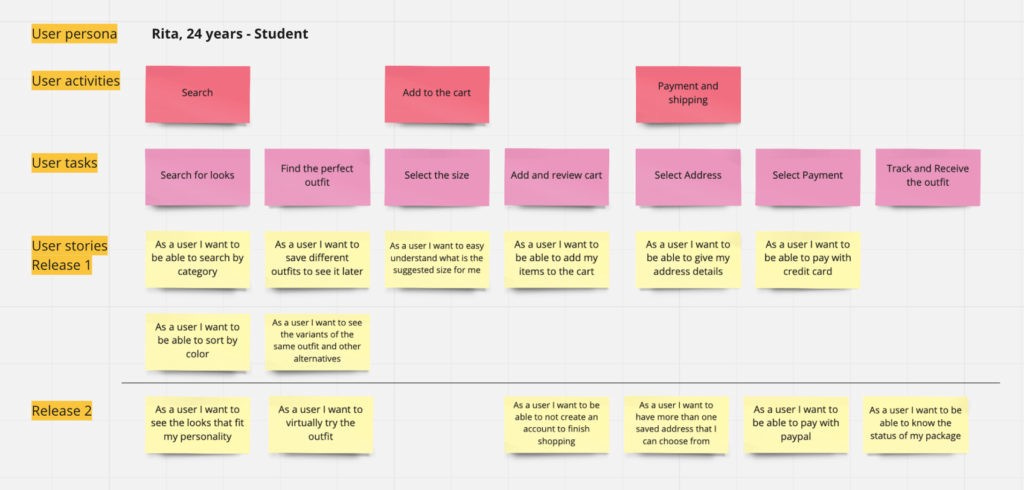
Criar as user stories
Neste momento tens a base do teu mapa e vamos começar a criar tarefas do utilizador em maior detalhe. Sempre na óptica do utilizador.
A melhor forma para criar user stories, é usar o modelo mais conhecido:
“Como [persona], eu [quero que]. [para que].”
Isto resultaria em algo assim: “Como Sarah, eu quero organizar o meu trabalho, para que me sinta com maior controlo”
Definir o que é prioridade e o que constará na próxima release
Agora deve ser possível prioiritzar as user stories. Podes ajudar o Product Manager a dividir as user stories por release, dependendo do tipo de gestão de produto que esteja em prática (entrega continua, release sazonal, etc).
Fazer este mapeamento permite entender o que será entregue ao longo do tempo e o valor que se está a aportar em cada versão do produto para que os utilizadores possam atingir o seu objetivo final.
As prioridades podem ser sempre alteradas mais tarde, sobretudo depois de entender a dificuldade técnica de cada uma delas*.* No entanto é importante priorizar com base no valor para o utilizador.
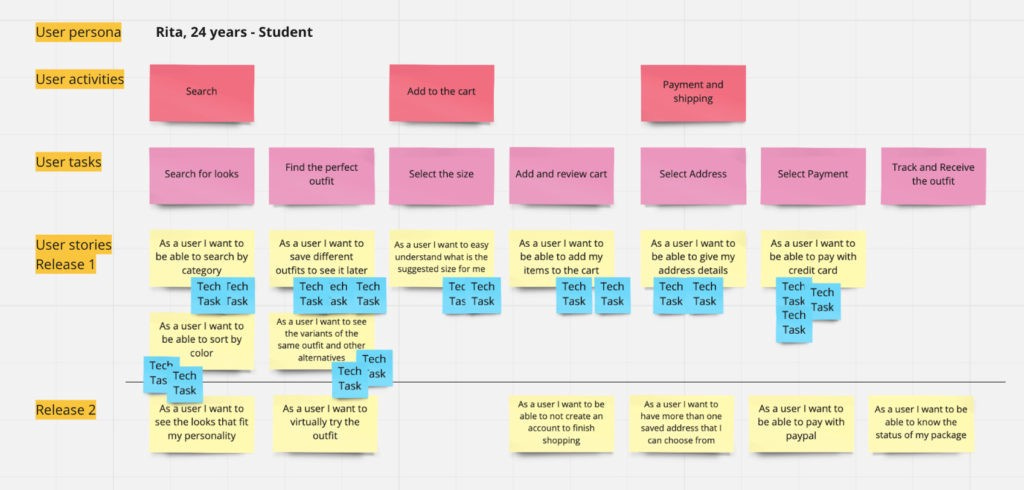
Partir cada user story em tarefas técnicas
Na fase final deste workshop devemos partir as user stories em tarefas técnicas. Elas devem permitir que as equipas de desenvolvimento entendam quais são as tarefas que têm que ser feitas, de forma a suportar cada tarefa do utilizador. Esta forma também permite um melhor método para estimar e priorizar o trabalho técnico de acordo com o valor para o utilizador.
Obrigado por leres a UX Snack Newsletter. Subscreve para receberes novos artigos e suportares o meu trabalho!
Tentei resumir ao máximo esta atividade. Podem encontrar mais informação aqui:


